Save Money On Your Motorcycle Insurance
- You could pay less than £195*
- Compare quotes from 25+ UK providers
- Fill in one form to compare top bike insurers
Getting Your Full Motorcycle Licence – A Beginners Guide (part 1)
Getting a full motorcycle licence in the UK can be a rather complicated and at times frustrating process.
Over the next few posts here on begin-motorcycling.co.uk I will be sharing my first-hand experience of doing just that, from start to finish.
Beginning with riding a motorcycle for the first time, right the way through to (hopefully!) getting my full bike licence.
About a year ago I took my compulsory basic training (CBT) and motorcycle theory test. You can read about how that went here.
Then, with my name on the right pieces of paper, I then went through the enjoyable process of buying my first motorcycle.
Cut to today, almost exactly a year after taping on my L plates for the first time and it is safe to say that the motorcycle bug has bitten me.
I now feel the need to become a fully qualified, road legal motorcyclist and work my way up to motorcycles with a larger engine than 125cc.
Sorry mum.
Laws and Licences
The UK Motorcycle licence is available in 3 individual tiers. The A1, A2 licence, and A licence. Each one of these licences are available to different age groups, and entitles the rider access to different powered motorcycles. Have a look at this guide to motorcycle licence categories and see which licence is available to you.
Being 28 years old, I’m aiming to get my A license by taking a Direct Access Course or DAS, removing the necessity for any more tests in the future, and giving me immediate access to any motorcycle which takes my fancy. A win-win in anybody’s book.
Mod 1 Test Cost
The module 1 motorcycle test costs £15.50.
You can book your test on the official DVLA site here.
Motorcycle Training School
So first things first. I needed some lessons.
From the outside, navigating my way around the two tests, known as Module 1 and Module 2 which I needed to pass to get my hands on the A licence seemed daunting.
So, I decided to take some lessons from a professional instructor. I was looking for a full bike licence course to pick up some tips and tricks and to correct any nasty habits I may have developed.
To find an instructor, I took a look through the extensive motorcycle training school directory here on begin-motorcycling.co.uk and discovered that the school closest to me also came very highly recommended – London Motorcycle Training.
A couple of super helpful and friendly phone calls later and I was booked in.
I was advised by the good chaps at London Motorcycle Training that, because of my one year of experience riding a manual 125cc motorcycle, I should book myself in for just one full day of training before my Mod1 test, and the same again for my Mod2.
So not wanting to ignore my first piece of advice, that’s exactly what I did.
Training Day
Module One training day came around super quick. I learned a thing or two about preparing myself from my CBT experience and made sure I had a tasty breakfast in my stomach, a sturdy pair of gloves on my hands, and a solid pair of boots on my feet.
A 9.30am start and I was introduced to my instructor for the day, Stuart. He had me undertake a quick assessment ride up and down the street on a big Honda 750 and decided I was ready to go straight to the big engine motorcycles.
An exciting start!
Module 1 of the motorcycle test is undertaken at the test centre itself, in an enclosed area.
As Stuart explained before we set off, the Mod1 test is an exercise in bike control. The examiner will instruct the rider to complete a number of slow and high speed manoeuvres around an apparent tangle of cones.
This can be a tricky thing to practice without access to the test centre itself. So with that in mind we got fitted out with high-visibility vests, and one way radios and headed towards a car park which was big enough for us to practice the module 1 test manoeuvres.
Stuart then explained that the module one test is made up of nine elements.
- wheeling the motorcycle
- using the stand
- riding a slalom
- riding a figure of 8
- a slow ride
- a U-turn
- cornering and a controlled stop
- cornering and an emergency stop
- cornering and hazard avoidance
Each exercise is marked on the test area by coloured cones, as you can see in these diagrams. It looks complicated, but don’t panic. Broken down to it’s individual elements it’s not so bad.
To replicate the test layout, Stuart laid out each exercise one by one on the carpark.
The whole test process is about showing that you have full control over the motorcycle, and that you have picked up the right kind of habits. Constantly assessing your environment for risks, while maintaining control of your motorcycle.
Test manoeuvres – Slow Speed
The trick with each and every one of these exercises is observation. Act like the test area is the public road. Shoulder checks, even though you know full well there is nothing there.
Wheeling the Motorcycle
The first task, wheeling the motorcycle, happens between the two side by side boxes marked with green cones.
On the day, you will ride into the test area through the gate and stop, then be told to move off (shoulder checks) and stop facing forwards inside one of the two boxes.
Top tip, aim for the right hand box to start with, that way when you wheel the bike backwards in a U shape into the other box you will be on the inside of the curve. This means the motorcycles weight will be kept leaning in towards you. Much easier to control than a bike that wants to fall away from you.
Another? Observations. Shoulder checks as you move out of box one, roll the bike around, and back into box two.
One hand on the left side of the handle bar and one on the grab rail at the back of the bike gives you the most control over the bike, and the sturdiest feeling grip.
Pop the side stand back down and step away from the bike. Golden.
The Slalom
From the green box you have ended in you will ride forwards, and into the slalom task.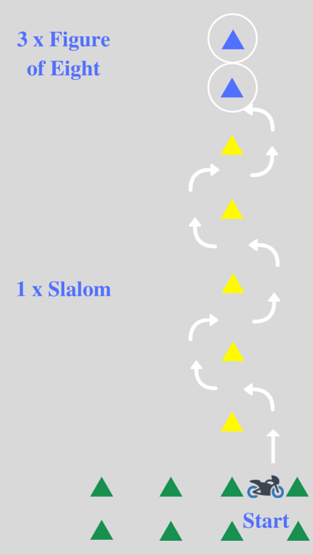
The slalom, Stuart informed us, is best done at around 7 or 8 mph. Again, observation here is key. Lifesaver checks over your left, then right shoulders before you move off.
Then a top tip from my mate Stuart.
Don’t look at the cones. Look where you want the bike to go, forwards and into the gaps. You will be amazed how much easier it makes things.
There is no rule as to how wide or tight you take the turns in either the slalom or the figure of eight. So follow a trajectory you are comfortable with.
Bear in mind however, that going too wide will mean you need to turn tightly to get back through the next ‘gate’ and turning too tight will destabilise the bike and force you to put a foot down.
Doing that at any point during in any of the maneuvers would result in a fail, which isn’t what we’re after!
Controlling the motorcycle on the clutch and the rear brake will give you both the best control over your speed, and most stability.
Set the throttle, and edge around the biting point with the clutch. According to the professionals, at any point when slow riding you should be pitting the engine and the rear brakes against one another. The engine pulling the motorcycle forwards and the rear brake trying to stop it.
A fine control of this balance will give you a lovely stable motorcycle. Now you just need to stay relaxed, and stay on top of it!
The Figure of Eight
From the end of the yellow cone slalom you will go straight into the blue cone figure of eight.
Again, look where you want to go, and take the curves as wide as you like.
The official rule on the Module 1 is three full figure of eights. But don’t bother counting, it’s just one more thing to think about.
Keep going until the examiner tells you to stop.
Stuarts’ nuggets of wisdom on this one?
Keep your head up but your gaze focused about two feet beyond the cone you are about to round.
Keep your speed steady with the back brake technique.
Aim to make your turns with one movement. Set your line with a turn of the handlebars and hold that line. Making lots of minor corrections to your front wheel will only destabalise the motorcycle. Much better to draw a massive, but smooth figure of eight, than a tight but wobbly one.
Eventually the examiner will tell you to pull away from the blue cones, and to ride over toward them.
Remember, even between exercises you are being observed. Feet down only when you are stopping, shoulder checks with any change of direction. Apparently as many people fail the Mod1 riding between the actual exercises as they do completing them.
Slow Ride
Now the slow ride towards the U turn area. Basically the same as you have just done on the figure of eight and the slalom, but in a straight line.
To practice this Stuart walked up and down the car park and had myself and classmate Harry follow him in a straight line without putting our feet down. About 4mph is the goal here.
The point of this exercise is to emulate slow moving traffic. Imagining this traffic for some reason was helpful to me.
Keep your eyes up. Picking a point in the distance to focus on. This, combined with nice relaxed arms, gripping the tank with your knees will reduce the amount of minor steering corrections you will make with your arms, keeping your line straight.
U-Turn
At the end of the slow ride you will have arrived between four blue cones. Ahead of you, an area bordered by two white lines, about a roads width apart. U turn time.
The examiner will stand just to the side of your starting point. Shoulder checks before you set off, then get a nice steady slow ride under control before throwing out your shoulder check and aiming for eye contact with the examiner.
This exercise replicates making a U turn in the road, so naturally you would want to check for cars over your shoulder before turning.
Keep your head turned and again, looking where you want to end up on the other side of the marked area.
A nice steady controlled turn here using all the slow ride clutch and rear brake techniques and you will be right as rain. Turning too tight caught me out a few times, making me put my foot down. Bad news in the test, but ok in the practice.
As long as you end up about a foot or less away from the white line on the other side it’s a pass so take the turn as wide and ‘sweepy’ as you like.
Test manoeuvres – Higher Speed
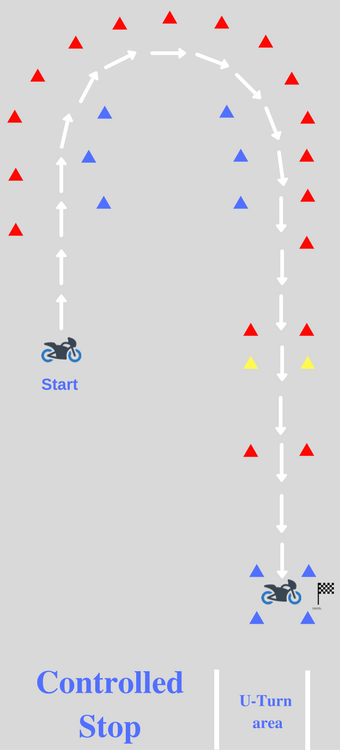
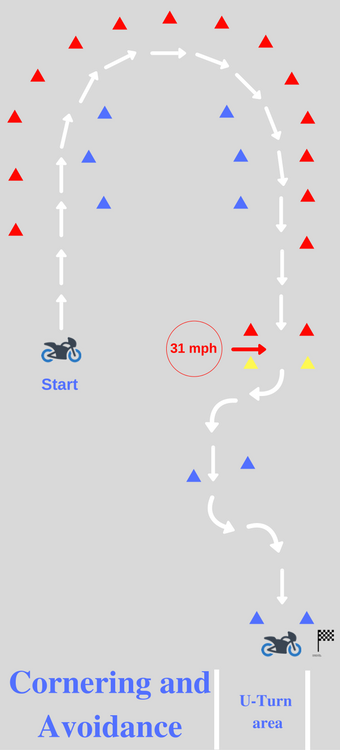
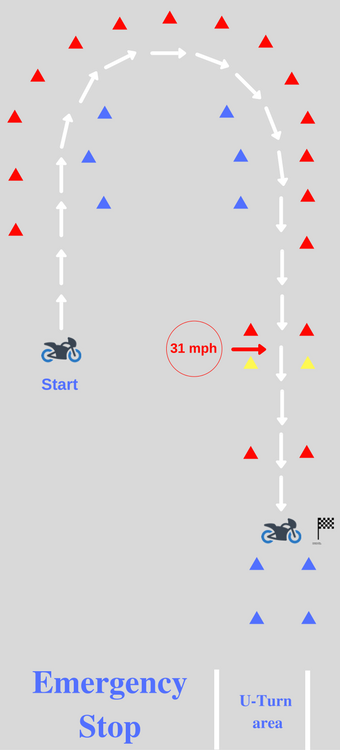
Now a series of faster circuit rides. Each of these are basically the same as one another, the only difference being the speed you need to maintain as you exit the turn and pass through the speed measuring gates, and the manoeuvre you need to execute at the end of the sweeping turn.
The three separate manoeuvres you will need to execute after you exit the turn are:
- Controlled stop
- Avoidance
- Emergency brake.
Getting used to the sound of the engine at the desired speeds during your practice days will be a huge benefit.Knowing how the motorcycle feels and sounds at the right speeds will save you having to look at the speedo during the test.
Controlled Stop
First up is the 19mph corner followed by a controlled stop into the blue coned area. The stopping exercise here is not the emergency stop, but rather a controlled stop, as you would at any junction or red light.
Front brake first, down through the gears and progressive on the back brake. Aim to stop with your front wheel right in the middle of the square marked with blue cones.
To do this perfectly Stuart advised us to put our handle bars over the first two cones. Nice little trick, considering you can’t really see your front wheel when you’re on the bike.
Avoidance
Turn the bike around, remembering your shoulder checks etc and line up for another pass at the long sweeping corner. Minimum speed 31mph (50kmh) this time ending with an avoidance manoeuvre.
Essentially dodging a cone. By avoiding braking until after you have made the swerve you will keep the bike more balanced and steady feeling. So up to speed, swerve around the blue cone, then get the bike straight again and bring it to a controlled stop.
A lot goes on quite quickly with this manoeuvre, so it’s best to really get yourself comfortable with it during practice.
If you are under speed on the test day you will get another go at it, but you will also pick up a minor so best to go a little over speed to be sure.
Emergency Stop
Last but by no means least is the emergency stop. Same corner, and again, a 31mph minimum.
As you pass through the gates the examiner will raise their hand, signaling you to come to a controlled stop as quick as possible.
Best tactic here? Use all three of the bikes brakes. Yes three. Front, back, and engine.
Get on the front brake as soon as that hand goes up and squeeze it progressively, don’t just whack it on! Then the back brake ever so gently afterwards.
Be cautious that the weight of the bike will have dived forwards at this point, so locking up the back wheel is more likely, and that’s a bad thing. Keep it really gentle on the back brake, and leave the clutch alone until right at the last moment. Using the power of the engine to scrub speed as well will do you some favours here.
If you end up stalling when you stop it isn’t the end of the world, I know I did plenty of times.
Finish the Test
At this point all your manoeuvres and exercises are done. Nice one, breathe deep.
But it isn’t over yet.
Top Tip:
Until you are off the motorcycle you are still under test conditions, so keep the observations happening often and obviously, right up until you park the motorcycle.
Final Thoughts
The Mod1 is a funny old thing, and it can feel quite unnatural doing manoeuvres in a big wide area.
Something which really helped me get my head round it was something I was told just before my test. Where Mod1 is about ‘doing’, about proving that you have control over the motorcycle as a piece of machinery, Mod2 is about ‘seeing’. Proving that you can read the road and other road users actions to continually make safe progress in the real world.
So focus on great bike control for mod1, but don’t forget those observations, and you will be just fine.
I got away with two minors on my test, one for being under speed on the emergency stop, and one for missing an observation as I moved away.
Either way, I hope you pass like I did, then we can forge on together to the Module2 training and test!
Until next time.