Worried about your lack of motorcycle maintenance knowledge?
Always left those things to the specialists? Afraid you might mess up your bike?
Then this is for you.
Save Money On Your Motorcycle Insurance
- You could pay less than £195*
- Compare quotes from 25+ UK providers
- Fill in one form to compare top bike insurers
Basic Maintenance
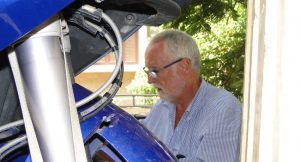
Nobody is born with an instant bank of motorcycle mechanical knowledge. Letting the mechanic do everything for you should keep your bike safe and well-maintained but that’s costly and you’ll learn little.
When I purchased my first bike I had little mechanical knowledge of motorcycles. I must have cleaned it three times on the first day before being tempted to unscrew or remove anything!
Sooner or later motorcycle riders come to appreciate that a good understanding of their bike’s components and how they operate goes a long way in keeping them safe, keeping their costs down and getting the most from their rides.
Read The Manual (Yes Seriously!)

What about starting with some low risk checks and light work to get you going and gain knowledge and confidence?
Firstly, the best way to know more about motorcycles is to… own one!
The great thing about owner’s manuals is that they are produced for owners and not veteran mechanics. The latter have their own downloadable versions with schematics and product part listings.
Owners, of course, come in all shapes and sizes and with varying degrees of technical knowledge.
Their manuals are a much lighter read, like a storybook which begins by congratulating you on your purchase followed by some easy-to-follow riding tips.
The secret is to stick with it and read it all the way through, occasionally checking pictures and diagrams against the real thing. Don’t worry if you don’t quite grasp everything at first. For now acquire some basic familiarity, bike language and establish a layer of knowledge onto which can be applied further layers.
Look and Listen
Perhaps the word ‘maintenance’ is misused. Generally, it implies that tools, disassembly and reassembly are involved although it can be no more than visual checks and light testing of operational controls.
Preventative maintenance is typical of that description but what exactly are we trying to achieve with it?
Don’t wait for a problem to occur before taking action.
Motorcycles ‘speak’ to us and it’s vital that we listen.:
Noises, vibrations, grinding, rattling, rubbing, rasping, whistling, flapping, clicking and sensations of unintended resistance is the language of the motorcycle telling the owner to pull over, get off and take a look.
Preventative maintenance is the art of looking for potential problems before the bike speaks.
Here is a list of ten checks and inspections to get you started:
#1 Warming Up

When your bike is sitting ‘cold’ after a night on the driveway, the engine oil, through the laws of gravity, will be sitting at the bottom of the sump.
Starting the bike quickly and revving the throttle before that oil has had a chance to flow and lubricate the moving parts is unwise.
Allow at least 30 seconds, preferably longer for the oil to move around.
Ideally, let the temperature indicator rise to the normal operating level.
Now you have a nice warmed up bike allowing the oil to do its job.
#2 Tires
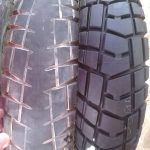
With upwards of 250kg of bike and rider combined just a few millimeters of rubber separates that weight from the road.
The manual will tell you the correct pressure for front and rear tires.
Check the tread and general condition making sure there’s no damage to the walls, any protruding objects or patches of wear.
UK law currently states a minimum tread of 1mm across 75% of the tread area and visible tread on the remaining 25%.
Read more:
#3 Chain
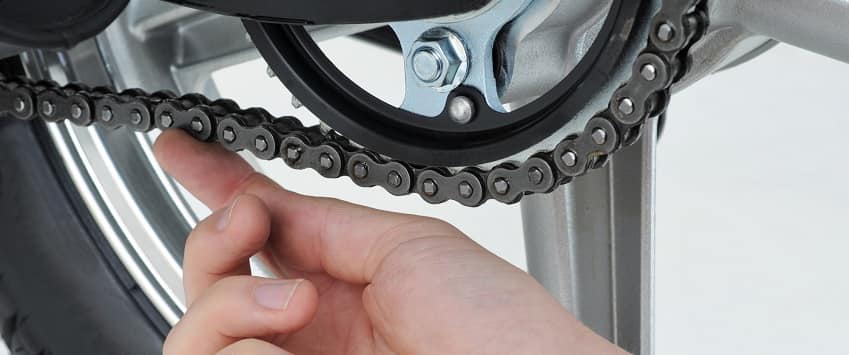
A very loose chain may slip off the sprockets, become tangled and lock out the back wheel.
A very tight chain is less directly dangerous but with prolonged stress, it could wear and damage parts.
Place two fingers under the lowest part of the chain and attempt to lift it. Typically 1.5 inches of play is about right but check your manual.
Heavy loads, riders and pillions will increase the tension so check again if these circumstances prevail.
Adjustments can be made by the rear wheel nuts and adjustment screws.
We’ve done an article on how to adjust a motorcycle chain or watch this video for more info;
A dry or rusty chain is a risk to safe handling.
Put your bike up on the main stand and raise the rear wheel while spinning it slowly. Apply a good coating of chain lubricating oil suitable for your bike.
A good time to do this is after your ride or in the evening allowing the oil to soak into the chain overnight.
If you prefer a more hands off approach, have a look at our article on the best motorcycle chain oilers.
#4 Liquids
The engine, clutch, brakes, cooling system and steering all require liquid to either lubricate or provide pressure.
Each has a reservoir or storage area where you can check levels.
Your manual will show you the location of these areas, the correct fluid or oil to use and how to safely check and top them up.
Steering fluid or fork oil is best left to the garage as it involves the removal and replacement of several rings and parts.
Always ensure the bike is on the central stand and kept level when checking fluids and oils. This will give an even reading.
Read more:
#5 Cables & Lighting
Cables and leads are found all over your bike. A simple visual inspection will expose any loose or damaged cables.
They should be secure and streamlined not detached or flailing where they can get caught.
Worn cables and termination points will lead to a sudden failure of breaks, clutch, or lighting components. They should be replaced immediately.
Lights are easy enough to check by starting the ignition and turning the switches of each light in turn. Brake lights, indicators, headlamps and beams are all powered by individual bulbs.
Also, check the correct height of your headlamp’s coverage area to ensure you’re not dazzling the car in front and that you can see far enough ahead at night.
Your manual will show you where on your headlight you can find the adjustment screw.
#6 Battery
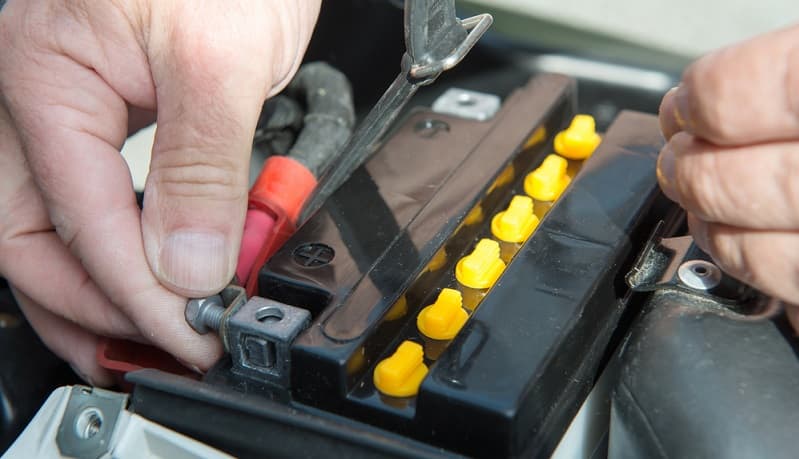
Usually tucked away in a protective box, shielded from the rain and dirt, is the battery.
Modern motorcycle batteries require little maintenance but through continuous vibration and use its possible the terminal connections can work loose or accumulate dirt, blocking the smooth flow of electrical charge.
The terminal connection points should be clean and the screws tight.
A dead battery can be re-charged but a poorly charging battery that continuously runs low may need replacing. See here for our guide to the best motorcycle battery chargers.
Here are the warning signs to indicate that you may have a dead battery.
#7 Brakes
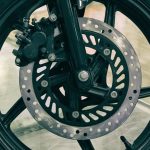
Aside from the brake fluid levels, you should also check the thickness of your brake pads. These are the components that grip or clamp your brake disc and actually make you bike slow down and stop.
Needless to say, continuous use will apply huge pressure and ultimately wear them down.
You may not fancy replacing them yourself but checking them should be easy enough.
The pads come in sets of two. Worn pads look thin and well-used. Healthy pads are much thicker.
Here’s how to compare.
#8 Air filters
Air filters trap dust and particles ensuring a smoother flow of air and better performance.
Dirty or clogged air filters reduce performance and must be cleaned or replaced. This is usually an easy task for newcomers who can simply remove the filter, wash it in kerosene and replace it again after covering it in a light coating of engine oil.
The latter helps dust and dirt to stick to the oil instead of passing through the filter. It’s also important to dry the filter after the kerosene wash.
Learn this simple procedure here.
Air filters are not very expensive so consider a replacement instead of continuous cleaning.
#9 Nuts and bolts
All over your bike are areas of potential looseness.
With your bike up on the central stand spend a few minutes checking wheel nuts, handlebars, side panels, luggage racks, wing mirrors, mudguards and anything that might work free over time.
#10 Mechanics
There’ll come a time where it would be unwise or even unsafe to attempt certain jobs yourself.
Mechanics are methodical with their work, removing and replacing items in the correct order and the right way around.
Engine stripping and major work have many considerations often outside the comprehension of the untrained.
Anything can be learnt and if you develop a liking for in-depth motorcycle mechanics then take a course or an apprenticeship.
Conclusion
Read, check, carry out light maintenance within your comfort zone and get curious. An inquisitive mind can be filled with knowledge. Build on that knowledge and add to the tasks you can complete.
You also need discipline and focus. Don’t become sloppy or develop untidy habits. It’s easy to kick over tools, screws and bolts so keep little containers and use a mat to avoid fouling the ground with oil. A tidy workplace shows a tidy mind and you’ll get less frustrated when things are in order.
Too often in life we’re sat at a desk working on a computer.
A little physical work on your motorcycle is satisfying and fun. You’ll feel a great sense of achievement after putting your tools away, cleaning up and riding off on your well-maintained machine.
On the rare occasion you break down you’ll now be reaching for your tool bag… and not your mobile phone.
Safe and happy riding to all.
Related
- What to do if your motorcycle won’t start
- How to jump-start a motorcycle
Image Credits
All photographs are part of John Kean’s private collection or via depositphotos and may not be reproduced without permission.